- Overview
- Latest Release Notes
- Historical Release Notes
- About ENCOO RPA Studio
- Product Introduction
- Quick Start
- Version Control
- Extension
- ENCOO Market
- FAQ
- ENCOO Component Library
- ENCOO RPA Robot
- ENCOO RPA Console
- Q&A
- LEGAL NOTICES
本文内容导航
Publish Automation Project
Publish Automation Project allows you to publish and store successfully edited automation projects for subsequent robot execution or sharing flows.
After the automation project is published to the console, it is stored in the flow package management page for assignment to the specified robot for execution. And after it is published to the flow market, it is stored in the specified flow market for sharing.
If you want to deliver an automation project directly to a robot for execution, you can send the automation project to the corresponding robot by publishing to the robot.
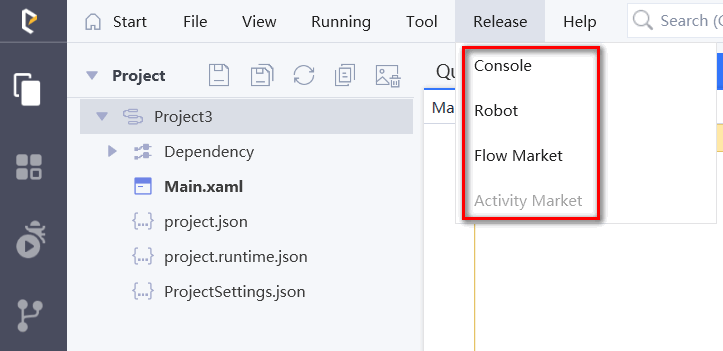
To implement the publishing flow, select the location you want to publish from the Toolbar -> Publish and click it.

Publish Flow
Create an automation project. For the sample projects, see Create Flow Project
Select the location you want to publish from the Toolbar -> Publish:
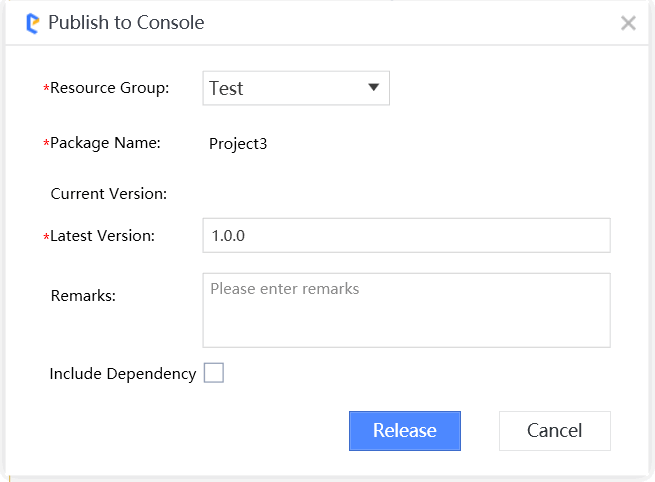
Publish to Console

a. In the Resource Group section, you can select which resource group you want to publish the project to.
b. Flow Package Name is the project name by default, it can be changed.
c. In the Version Number section, you can view the Current Version Number of the project and add the Latest Version Number as needed. If you change the version number information, it is important to note that the latest version number should be higher than the current version number.
d. (Optional) The Notes section is mainly used to enter the version and other information related to the current automation project. Please note that the Notes field accepts a maximum of 220 characters.
f. In the "Include Dependencies" section, if checked, the dependencies of the project are included in the flow package when the project is published; if unchecked, the dependencies are not included in the flow package.
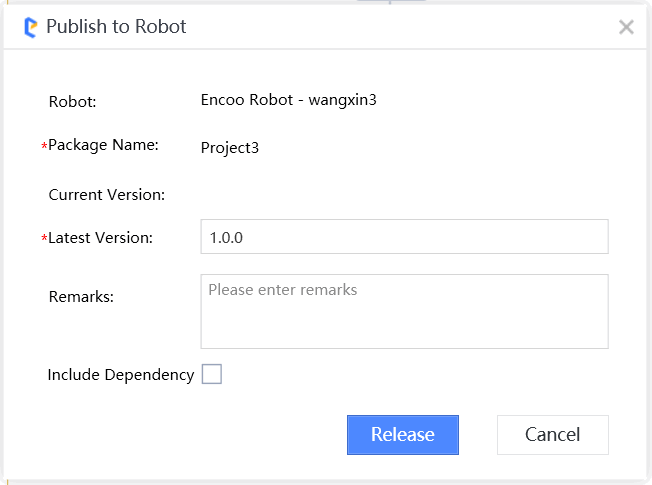
Publish to Robot

a. In the Robot section, the name of the robot that is currently activated in the system is displayed.
b. Flow Package Name is the project name by default, it can be changed.
c. In the Version Number section, you can view the Current Version Number of the project and add the Latest Version Number as needed. If you change the version number information, it is important to note that the latest version number should be higher than the current version number.
d. (Optional) The Notes section is mainly used to enter the version and other information related to the current automation project. Please note that the Notes field accepts a maximum of 200 characters.
f. In the "Include Dependencies" section, if checked, the dependencies of the project are included in the flow package when the project is published; if unchecked, the dependencies are not included in the flow package.
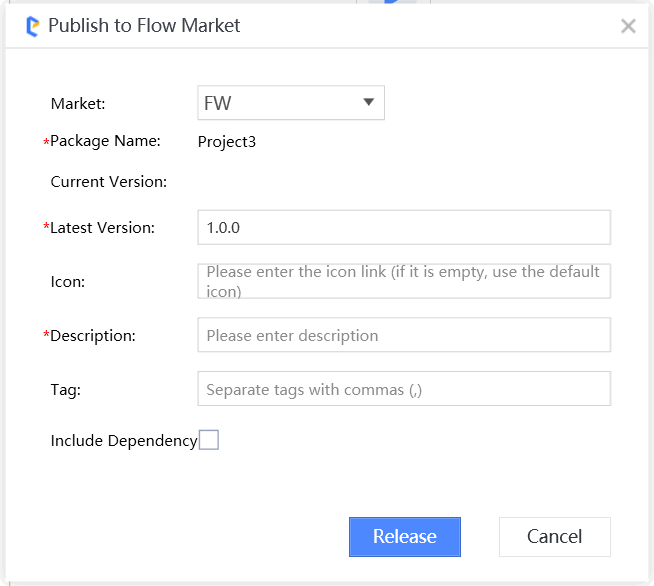
Publish to Flow Market

a. In the Flow Market section, you can select which flow market you want to publish the project to. Please note that the first time you publish, you will need to configure your market through Manage Market, please refer to Manage Market for details.
b. Flow Package Name is the project name by default, it can be changed.
c. In the Version Number section, you can view the Current Version Number of the project and add the Latest Version Number as needed. If you change the version number information, it is important to note that the latest version number should be higher than the current version number.
d. (Optional) Icon is mainly used to identify the currently published flows.
e. Description section is mainly used to enter a description of the functionality of the current automation project. Please note that the Description field accepts a maximum of 200 characters.
f. (Optional) Tag is used to define the current flow.
g. In the "Include Dependencies" section, if checked, the dependencies of the project are included in the flow package when the project is published; if unchecked, the dependencies are not included in the flow package.
Click "Publish" and the project will be published to the specified location.
After successful publishing, the prompt in the bottom right corner of the page reads:
Name of the successfully published project
Version number of the project


